In this tutorial we are going to build a small but powerful cloud architecture that demonstrates how modern infrastructure works in practice.
By the end you will have a system that:
- Runs a containerised application
- Automatically replaces failed servers
- Stores Docker images in AWS ECR
- Deploys infrastructure using Terraform
- Uses an Auto Scaling Group for resilience
- Allows safe debugging via SSH
- Demonstrates scaling behaviour visually in a browser
Instead of just reading about autoscaling, you will actually see it happen live.
The Goal of This Project
Most cloud tutorials stop once infrastructure launches. That doesn’t show how systems actually behave.
The goal of this project is to demonstrate:
- Infrastructure as Code
- Immutable deployments
- Self-healing systems
- Container based application delivery
- Autoscaling behaviour
At the end we will add a lightweight frontend dashboard that shows the cluster scaling in real time.
Cost Expectations and Safety
This tutorial is designed to stay extremely cheap.
We will use the smallest instances possible:
t3.nano
Autoscaling will be limited to:
max_size = 5
Typical cost while experimenting is only a few cents per hour.
Destroy All Resources When Finished
When you finish the tutorial, run:
terraform destroy
This will remove all infrastructure and stop all billing.
Install AWS CLI
Install the AWS CLI.
brew install awscli
Then configure credentials.
aws configure
Enter:
- AWS Access Key
- AWS Secret Key
- Region (example: ap-southeast-2)
Install Terraform
Terraform allows us to define infrastructure using code.
brew install terraform
Create the Terraform Project
Create a project folder:
mkdir autoscaling-demo
cd autoscaling-demo
mkdir infra
Inside the infra folder we will organise files:
main.tf
network.tf
compute.tf
asg.tf
iam.tf
ecr.tf
This keeps infrastructure organised.
Create an ECR Repository
ECR stores Docker images.
Terraform resource example:
resource "aws_ecr_repository" "app" {
  name = "autoscaling-demo"
}
Build and Push the Docker Image
Create a simple app container.
docker build -t autoscaling-demo .
Tag for ECR:
docker tag autoscaling-demo:latest \
ACCOUNT_ID.dkr.ecr.REGION.amazonaws.com/autoscaling-demo:latest
Login to ECR:
aws ecr get-login-password \
| docker login --username AWS --password-stdin ACCOUNT_ID.dkr.ecr.REGION.amazonaws.com
Push:
docker push ACCOUNT_ID.dkr.ecr.REGION.amazonaws.com/autoscaling-demo:latest
Create IAM Role for EC2
EC2 instances need permission to pull images.
Attach this policy:
AmazonEC2ContainerRegistryReadOnly
This allows instances to authenticate with ECR.
Define the Launch Template
A launch template defines the configuration of every server.
- AMI
- instance type
- security groups
- IAM role
- startup script
The startup script installs Docker and runs the container.
Create Security Groups
Security groups act as firewalls.
Allow:
port 22  SSH
port 80  HTTP
Restrict access to your IP if possible.
Create the Auto Scaling Group
This is the core of the architecture.
min_size = 2
desired_capacity = 2
max_size = 5
The Auto Scaling Group ensures:
- servers are replaced if they fail
- capacity remains stable
- scaling policies can increase instances
Stateless vs Stateful Applications
Autoscaling works best with stateless applications.
Stateless apps:
- API servers
- microservices
- containerised backends
Stateful apps are harder to scale.
- WordPress
- databases
- file storage
Those require shared storage or external databases.
Boot Instances Using Cloud Init
EC2 runs a script on startup called user data.
This script installs Docker and launches the app.
yum install docker -y
service docker start

docker login ECR
docker pull IMAGE
docker run -p 80:8080 IMAGE
SSH Into Instances
Find the instance IP:
aws ec2 describe-instances
Then connect:
ssh ec2-user@INSTANCE_IP
Debugging Issues
Useful commands:
docker ps
docker logs container
Cloud-init logs:
/var/log/cloud-init-output.log
ECR Token Expiry
ECR login tokens expire.
If docker pull fails run:
aws ecr get-login-password \
| docker login --username AWS --password-stdin ACCOUNT_ID.dkr.ecr.REGION.amazonaws.com
Test Instance Replacement
Terminate an instance:
aws autoscaling terminate-instance-in-auto-scaling-group \
--instance-id INSTANCE_ID \
--no-should-decrement-desired-capacity
The Auto Scaling Group launches a new instance automatically.
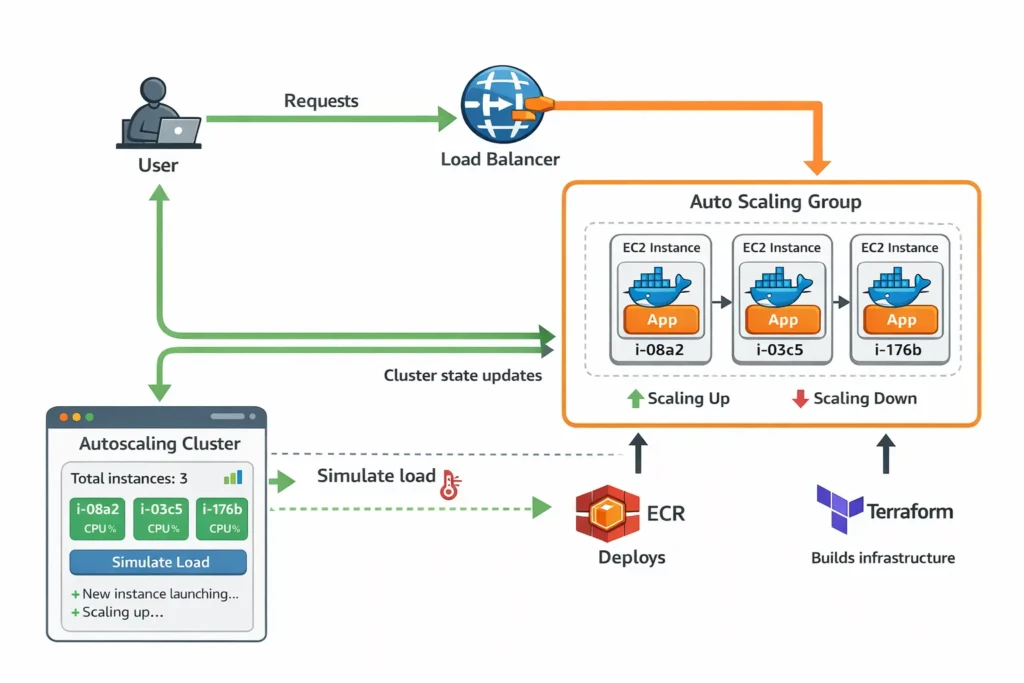
Resulting Architecture
User
 |
Load Balancer
 |
Auto Scaling Group
 |      |
EC2    EC2
 |      |
Docker  Docker
 |      |
App     App
Load Balancing Options
Adding a Load Balancer
Right now our infrastructure has an Auto Scaling Group running multiple EC2 instances, but users must connect directly to a server IP.
This is not ideal because:
- Users would need to know which instance to connect to
- If an instance dies the IP disappears
- Traffic would not be distributed across servers
A load balancer solves this problem.
The load balancer becomes the single entry point to the system. It receives requests and forwards them to healthy instances.
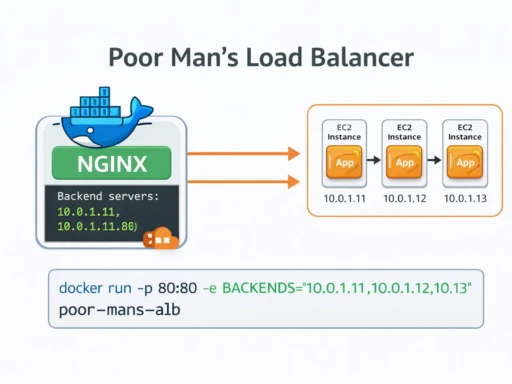
Option 1 — Poor Man’s Load Balancer (Free)
AWS Application Load Balancers require billing to be enabled. If you want a completely free solution for this tutorial you can run a simple NGINX container that acts as a load balancer.
Create a small EC2 instance that runs NGINX.
Example NGINX configuration:
events {}

http {

 upstream backend {

  server 10.0.1.10;
  server 10.0.1.11;
  server 10.0.1.12;

 }

 server {

  listen 80;

  location / {
   proxy_pass http://backend;
  }

 }

}
This distributes incoming traffic across the backend servers.
This is not production grade but it works well for demos and tutorials.
Click here for a full tutorial on a poor mans LB (to avoid AWS costs)
Option 2 — AWS Application Load Balancer
The production solution is AWS ALB.
An ALB automatically distributes traffic across instances and performs health checks.
To connect the Auto Scaling Group to the load balancer we use a Target Group.
The Target Group represents the pool of instances receiving traffic.
Create the Target Group
resource "aws_lb_target_group" "app" {

 name     = "autoscaling-demo"
 port     = 80
 protocol = "HTTP"
 vpc_id   = aws_vpc.main.id

 health_check {

  path = "/health"
  port = "80"

 }

}
Create the Load Balancer
resource "aws_lb" "app" {

 name               = "autoscaling-demo"
 load_balancer_type = "application"
 subnets            = aws_subnet.public[*].id
 security_groups    = [aws_security_group.alb.id]

}
Create the Listener
resource "aws_lb_listener" "http" {

 load_balancer_arn = aws_lb.app.arn
 port              = "80"
 protocol          = "HTTP"

 default_action {

  type             = "forward"
  target_group_arn = aws_lb_target_group.app.arn

 }

}
Attach the Auto Scaling Group
Finally we connect the Auto Scaling Group to the Target Group.
resource "aws_autoscaling_group" "app" {

 target_group_arns = [aws_lb_target_group.app.arn]

}
Now traffic flows like this:
User
  ↓
Load Balancer
  ↓
Target Group
  ↓
Auto Scaling Group
  ↓
EC2 Instances
The load balancer automatically removes unhealthy instances and routes traffic only to healthy servers.
Test the Load Balancer
After deployment Terraform will output the load balancer DNS name.
terraform output
Open the DNS name in your browser.
Refreshing the page several times should show different instances serving requests.
Scaling Rules
Example policy:
Scale up: CPU > 60%
Scale down: CPU < 20%
CloudWatch metrics trigger scaling events.
GitHub Actions Deployment Pipeline
CI/CD pipeline:
push code
  |
build docker image
  |
push to ECR
  |
update infrastructure
  |
rolling deployment
Visual Autoscaling Dashboard
Finally we create a small Alpine.js dashboard that shows cluster activity in real time.
This polls the backend every few seconds.
        <div x-data="cluster()" x-init="start()">
            <h2>Cluster State</h2>

            <div class="cluster">
                <template x-for="instance in instances">
                    <div class="node">
                        <p x-text="instance.id"></p>
                        <p x-text="'CPU: ' + instance.cpu + '%'"></p>
                        <p x-text="instance.state"></p>
                    </div>
                </template>
            </div>
            <button @click="simulate()">Simulate Load</button>
        </div>
What You Learned
- Terraform infrastructure
- Docker deployment
- AWS ECR
- Auto Scaling Groups
- Immutable servers
- Self healing systems
- Autoscaling behaviour
Most importantly you saw how modern cloud systems behave in practice.