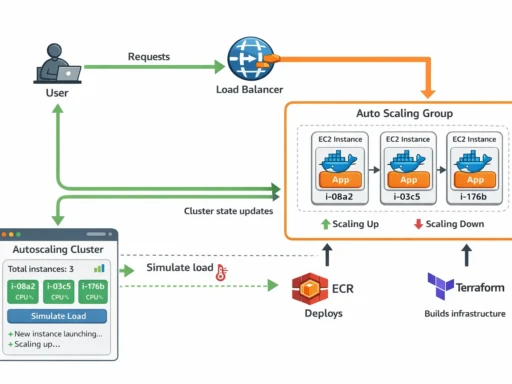
Cloud infrastructure is powerful, but it’s also very good at quietly draining your wallet. Many AWS services charge per hour or per request, and if you’re experimenting, learning, or running small side projects, costs can escalate faster than expected. Managed load balancers like AWS ALB are excellent in production environments, but they can feel unnecessary when you just need something simple for a demo, tutorial, or personal project.
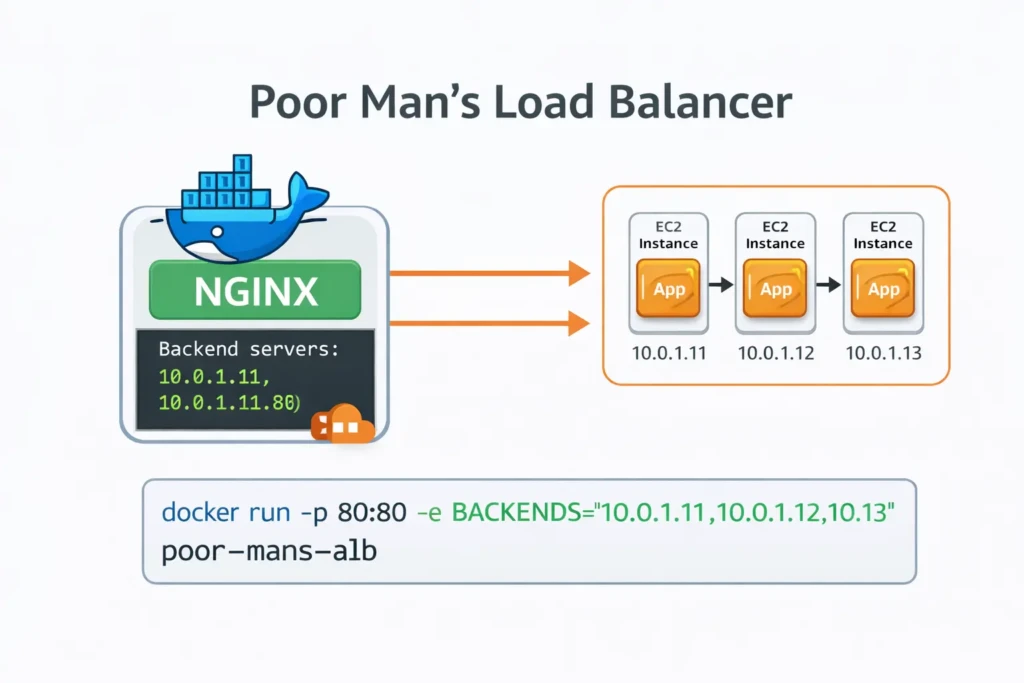
In this guide we’ll build a lightweight “Poor Man’s Load Balancer” using Docker and NGINX. It’s simple, portable, and can run almost anywhere. While it isn’t a full replacement for a managed cloud load balancer, it’s perfect for testing distributed systems, learning how traffic routing works, and most importantly — keeping your cloud bill (at least for this part) as close to zero as we can get…
Building the “Poor Man’s Load Balancer” Docker Image
For readers who want to run the tutorial without enabling AWS billing, we can build a lightweight container that acts as a simple load balancer.
This container uses NGINX to distribute traffic across backend servers. Instead of manually editing configuration files, we generate the NGINX configuration dynamically from an environment variable.
The environment variable BACKENDS will contain a comma-separated list of backend instance addresses.
Example:
BACKENDS="10.0.1.10:80,10.0.1.11:80,10.0.1.12:80"
The container will convert this into a valid NGINX upstream configuration and begin routing traffic.
Dockerfile
FROM nginx:alpine

RUN apk add --no-cache bash

COPY nginx.conf.template /etc/nginx/templates/nginx.conf.template
COPY docker-entrypoint.sh /docker-entrypoint.sh

RUN chmod +x /docker-entrypoint.sh

EXPOSE 80

ENTRYPOINT ["/docker-entrypoint.sh"]
Entrypoint Script
This script reads the BACKENDS environment variable and dynamically generates the NGINX configuration.
#!/usr/bin/env bash
set -euo pipefail

if [ -z "${BACKENDS:-}" ]; then
  echo "ERROR: BACKENDS environment variable is required"
  echo 'Example: BACKENDS="10.0.1.10:80,10.0.1.11:80,10.0.1.12:80"'
  exit 1
fi

UPSTREAMS=""
IFS=',' read -ra ADDR <<< "$BACKENDS"

for backend in "${ADDR[@]}"; do
  UPSTREAMS="${UPSTREAMS}    server ${backend};\n"
done

export UPSTREAMS

envsubst '${UPSTREAMS}' \
< /etc/nginx/templates/nginx.conf.template \
> /etc/nginx/nginx.conf

echo "Generated nginx.conf:"
cat /etc/nginx/nginx.conf

exec nginx -g 'daemon off;'
NGINX Configuration Template
The upstream servers will be injected into this template when the container starts.
events {}

http {

 upstream backend {
${UPSTREAMS}
 }

 server {

  listen 80;

  location / {
   proxy_pass http://backend;
  }

 }

}
Build the Image
Inside the load balancer directory run:
docker build -t poor-mans-alb .
Run the Load Balancer
Replace the IP addresses with the private IPs of your EC2 instances.
docker run -p 80:80 \
-e BACKENDS="10.0.1.10:80,10.0.1.11:80,10.0.1.12:80" \
poor-mans-alb
Your container will now distribute traffic across the backend servers.
This is obviously much simpler than AWS Application Load Balancer, but it works well for demonstrations and tutorials.
In production environments you should use AWS ALB or another managed load balancing solution.